|
I should have been the one to fill your dark soul with liiiiiiiiiiight! |
| This article is a stub and is missing information. You can help the Devil May Cry wiki by expanding it. |
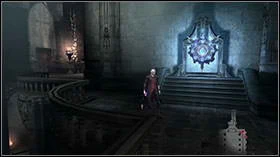
A Crest switch near Nero
Trigger Devices or Switch Devices are environmental objects in the Devil May Cry series. These are Crests (紋章 Monshō?) in Devil May Cry, Devil May Cry 3 and Devil May Cry 4, Seal Spheres (シールスフィア Shīru Sufia?) and Trigger Stones (トリガーストーン Torigā Sutōn?) in Devil May Cry 2 as well as Blood Clots in Devil May Cry 5. They primarily act as switch mechanisms that allow the player to activate objects related to the device, or to trigger a certain event, in order to proceed.
Functions[]
In order to activate Crests, Seal Spheres and tower rotation devices, the player must hit them with melee weapons (or Pandora in DMC4). After several hits device will become gradually lit on the outside. The player should continue attacking until it's completely lit and activated, if attacks stop before lights will slowly go back out. Trigger Stones require just one hit.
The outcome of the activation varies depending on the situation. Some devices open Sealed Doors, others trigger platforms to appear or to move. Some even generate very specific results, such as firing a laser at The Savior.
Devil May Cry[]
In the first game of the series, Crest switches are large, round, shield-like features usually set into a wall, emblazoned with an eldritch runes – 12 small on the outside, one big in the center. When struck, runes along the outside of the device will light up clockwise, and the mechanism will activate once all have been illuminated.
Locations and purpose[]
| Location | Function |
|---|---|
| Mission 1 Plane hangar |
Activates elevator to the basement. |
| Mission 4 Bottom of the tower |
Activates elevator to the top. |
| Mission 9 Barbican |
Activates flying platforms used to access Ifrit. |
| Mission 15 Moving passage on the Red Shield side |
2 Crests used to lower the barriers on the way to pedestal with either Pair of Lances or Nightmare-β. Cannot be re-activated once the barriers are back up. |
| Mission 16 Main Hall in place of Mundus statue |
Causes lightning to hit the knight statue turning it into Plasma. |
| Mission 16 Cathedral |
4 Crests used to activate the pads restraining Nightmare. |
| Mission 18 Bottom of the tower |
Floods the tower allowing swim to the top. |
| Mission 18 Courtyard |
2 Crests used to activate the pads restraining Nightmare. |
| Mission 20 Nightmare Chamber |
2 Crests used to activate the pads restraining Nightmare. |
| Mission 21 Lava Lung Chamber |
2 Crests raise the stone pillars allowing to get to the top of the chamber. |
| Mission 21 Top of the Heart Chamber |
Pulsates the Heart lifting seals from the door leading to Mundus's Temple. |
Devil May Cry 2[]
In Devil May Cry 2, there are two main types of trigger devices:
- Seal Sphere is a glowing blue-white globe, orbited by white cubes that turn purple counter-clockwise when struck. When fully activated, the cubes turn into a blue flat ring, inscribed with markings.
- Trigger Stone is a sphere floating above an inverted rotating pyramid. When struck, a grid pattern appears, slowly vanishing the longer it takes to activate the next device.
Locations and purpose[]
Seal Spheres[]
| Location | Function |
|---|---|
| Dante's Mission 2 Second Catacomb section |
Opens the sealed door leading to the Aerial Heart altar and exit from catacombs. |
| Dante's Mission 7 Top of spiral staircase |
Lifts the seal from the Flame Heart altar. Cannot be activated if the Heart was already acquired. |
| Dante's Mission 10 Ruins |
Opens the door to underground section. |
| Dante's Mission 11 Rotating room |
Activates the rotating room. |
| Dante's Mission 11 Floating floor room |
Activates the elevator to the top of the room. |
| Dante's Mission 14 Lower town |
4 Spheres scattered across the lower town each lift on seal from the portal to the demon world. |
| Dante's Mission 16 Uroboros building |
Animates the Abyss Goat statues in the Frost Heart altar room that appears after using the 3rd Sacrilege. |
| Lucia's Mission 2 Clock Tower 1st floor |
Animates the Goatling statues |
| Lucia's Mission 2 Clock Tower 3rd floor |
Activates the clockwork, opening passage to the 4th floor. |
| Lucia's Mission 5 Generator room |
Powers up the factory, allowing access to the courtyard. |
| Lucia's Mission 5 Top of spiral staircase |
Lifts seal from the Flame Heart altar. Cannot be activated if the Heart was already acquired. |
| Lucia's Mission 7 Water flow control room |
Lowers the wall in the room below stopping the water flow and allowing access to Tateobesu room. |
| Lucia's Mission 10 Lower town |
4 Spheres scattered across the lower town each lift on seal from the portal to the demon world. |
| Lucia's Mission 12 Uroboros building |
Animates the Abyss Goat statues in the Offence Heart altar room that appears after using the 3rd Sacrilege. |
Trigger Stones[]
| Location | Function |
|---|---|
| Dante's Mission 4 In front of the lighthouse |
Opens the barred door leading to the docks. |
| Dante's Mission 9 Factory courtyard |
3 Stones open the door inside the building – each represented by red light at the panel near the door, once a Stone is hit light turns green. |
| Dante's Mission 10 |
2 Stones activate one half of the door leading to the Seal Sphere each, when 2 are active at the same time the door opens. |
| Lucia's Mission 7 Water flow control room |
7 Stones sharing the timer if all are hit until the time is up floating pads leading to the top of the room appear. |
Devil May Cry 3[]
Crest switches in Devil May Cry 3 look somewhat similar to a ship's helm – it's a stone circle with a sphere in the center and red background between them locked by 8 bars. When hit enough times the Crest releases locks one by one – bar extends and a red flame appears on its end, once all 8 are released the device is active.
After the seal is broken and Temen-ni-gru is active, a new kind of device appears, similar to basic Crest – a large stone shield with 3 rhombi (red, teal and purple) and 8 lock bars with blue flames. It is used to rotate the concentric sections of the tower.
Locations and purpose[]
| Location | Function |
|---|---|
| Mission 3 Bullseye Bar |
Lifts the blue seal. |
| Mission 4 Silence Statuary |
Activates the elevator to Incandescent Space. |
| Mission 5 and Secret Mission 4 Surge of Fortunas |
Activates the elevator to Azure Garden. |
| Mission 6 and Mission 17 Trial of the Warrior |
2 Crests active at the same time turn enemies' Devil Trigger off. |
| Mission 7 Cursed Skull Chamber |
Lowers the skull wrecking ball that contains the Crystal Skull. |
| Miision 9 Subterranean Garden |
Resets the crystal puzzle (once the puzzle has been solved stays active). |
| Mission 13 and Secret Mission 10 Vestibule |
Resets the crystal puzzle (once the puzzle has been solved stays active). |
| Mission 15 Forbidden Land: Front |
Activates the tower rotation mechanism. |
| Mission 16 Waking Sun Chamber |
Lowers the skull wrecking ball that opens the gates to the Golden Sun. |
| Mission 16 Chamber of Sins |
2 Crests lower the skull wrecking balls that open the gate to the Onyx Moonshard. |
Devil May Cry 4[]
Differences[]
In Devil May Cry 4, Crest switches take on more of a pedestal appearance, and the runes project out of the device when being activated. The runes will also spin just as the player reaches activation, and will slam back into the pedestal when activation is complete.
List of device locations[]
Here is a list of the pedestals and their given functions;
| Number | Mission | Function |
| 1 | Mission 2 | The area where the device was first introduced, used to break the magic barrier |
| 2 | Mission 3 | Used to disable the magic barrier allowing quicker actions. |
| 3 | Mission 4 | Used to open the gate so that the gyro blade can break the magic barrier. |
| 4 | Mission 6 | Used to make the "bridge" fall out allowing the gyroblade destroy the giant statue of pointlessness |
| 5 | Mission 7, and Secret Mission 7 | Used to make the magic brigde fall into reality. |
| 6 | Missions 9 and 10 | Used to call the teleporter. |
| 7 | Mission 11 | Used to spawn Grim Grips. |
| 8 | Mission 18 (2 sets) | Used as weapons against The Savior. One as a cannon, and one as a laser cannon |
| 9 |