No edit summary |
m (→Lapis River: linked to SM05) |
||
| Line 37: | Line 37: | ||
===Lapis River=== |
===Lapis River=== |
||
| − | There are plenty of egg sacs for orb gathering around this area. Secret Mission 05 is also located here. Simply head straight after collecting some Orbs. |
+ | There are plenty of egg sacs for orb gathering around this area. [[Devil May Cry 4 walkthrough/SM05|Secret Mission 05]] is also located here. Simply head straight after collecting some Orbs. |
:Note: There are 12 breakable pods here. |
:Note: There are 12 breakable pods here. |
||
Revision as of 07:18, 28 July 2013
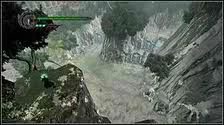
As Nero emerges out the other side of Lamina Peak, pondering how a lush semi-tropical forest can exist at this elevation, Dante appears. Dante then disappears in what can only be described as BASE jumping without a parachute. Well, since he's toast, (yeah, right!) all that's left for Nero to do is deal with the demon that's been messing with the forest.
Walkthrough
Forest Entrance
You will begin the mission in here. In this area you find a number of egg sacs for orb farming. Also you will locate Secret Mission 08 here (it is hidden inside the mini-grave house beside the tree trunk). a Red Orb Crystal is also here, so you should be able to maximize your orbs if you want to complete the Vitality and Devil Trigger Gauge. Simply head straight to the path between the rocky mountains.
Windswept Valley
The location of the Holy Water is on the cliff.
You can find Holy Water by jumping along the northern edge of the map. Simply head straight down. Here you will find a new breed of lesser-demon, the Chimera . Chimeras are weak to buster, yet if left unattended, can prove deadly. Kill them as fast as you can. Head through the stairs and enter through the church.
- Note: There are 9 breakable pods here.
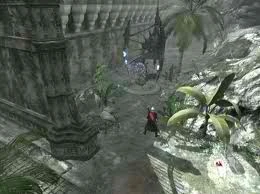
Ruined Church
This part can be very tough, as Scarecrows and Assaults are now infested with Chimeras. Killing them can be very difficult, as the Chimeras can help their hosts in attacking Nero by whipping their sword-imbued tentacles. A good strategy for this is to fire them with Charge Shot 3 and perform Red Queen Combo C, as this can be very helpful in crowd control. After defeating them, there are egg sacs for orb farming beside the area. Simply break the mirror wall to get through there. There is also a combo statue for Dante, which can be accessed later in the game. Afterwards climb up through the stairs and activate the bridge there. Be careful though, as this bridge can disappear later. Head straight to the door afterwards.
- Note: There are 19 breakable pods here.
Ruined Valley & Ruined Lowlands
If you had already an experience with Vanishing Floors, this is a perfect area to test it, because in order to get on the other side, you must activate the bridge to get there. That is not easy, as Mephistos are scattered around the area, with attacks that can cause you to fall down to Ruined Lowlands. A Blue orb fragment can be found here also. Simply use Air Hike to reach it.
If you fall down, and you want to if you want all the hidden Red Orbs, you'll end up in the Ruined Lowlands. Enemies encountered are either Mephisto or Scarecrows. There's a cache of Red Orbs in one of the corners, so make sure to grab it before you leave.
- Note: There are four breakable pods in the Ruined Lowlands.
Lapis River
There are plenty of egg sacs for orb gathering around this area. Secret Mission 05 is also located here. Simply head straight after collecting some Orbs.
- Note: There are 12 breakable pods here.
Ancient Plaza
A fight will occur here, so simply enjoy killing demons and head straight afterwards.
- Note: There are nine breakable pods here.
Windswept Valley
Use the Gyro Blade to destroy the obstacles. Head straight to a door after.
- Note: there are four additional breakable pods here that you couldn't reach during your first visit.
Ruined Valley
Echidna's first attack will occur here as she attempts to destroy the bridge while trying to kill you. Run as fast as you can and destroy any obstacles that come into.
- Note: There are 18 breakable pods here, but Echidna will destroy some of them for you.
Forgotten Ruins
The Combat Adjudicator
A Blue Combat Adjudicator statue is located here. Also, another fight occurs with Chimera-infested Scarecrows again. Simply use the early strategy before. You can also buy Vital stars in a Divinity Statue as you get yourself prepared for the Boss battle.
- Note: There are 8 breakable pods here, but two are on top of the bridge and require some fancy tricks to reach. Try using EX-High Roller to get into the air, then firing your gun over the bridge next to where the adjudicator was. Having played through Mission 8 will help with locating them.
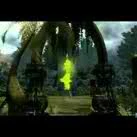
Den of the She-Viper
Walk up the stairs to trigger a cutscene. At the end of the battle, Nero will be rewarded with the Sephirothic Fruit, and with it the ability to open new paths.
- Note: There are 8 breakable pods in this area. They can be broken during the boss fight for some modest vitality replenishment.
Boss: Echidna the She-Viper
The Hell Gate of Echidna
As a boss, Echidna has many varied attack forms. The trick to defeating her is to know which strategy to apply to what form.
First Phase
- Her first attack form is simply a tail whip on you. This can be dodged by jumping, double-jumping, or just dodging (Table Hopper.) You can try using Snatch to get close to her and deal some damage, too. Afterwards she will always transform into dragon mode.
- In her dragon form, she flies around outside of the arena and will charge at you, cutting through the arena. You can deal a little damage with your ranged attack here, but the main way to damage her in this form is to Buster her. If you get your timing right, you can Buster (make sure not to lock on!) just as she's about to collide with you, and this will deal some serious damage.
- Her third form can be loosely described as her spider form, where she suspends herself above the ground and drops Chimera Seeds from her egg sac. This sac can be Bustered, and will take serious damage from DT and Exceeded attacks.
- In her final form, she buries her tail in the ground and shoots her tail tendrils out of the ground at you. There are two variations of this form, as well: One where she has four tendrils equally spaced that flail randomly, and one where she sends them out directly at you in groups of about 3. Run away from the latter variant, and for the former, get in close and deal some damage, as she's rather vulnerable in this form. Get right on top of her and use aerial attacks and constant jumping to keep yourself safe from her tails. Make sure to jump off when she stops "taunting" and starts to get up, or you will get hit.
A good strategy for this whole battle is to ready Charge Shot 3 and shoot whenever she appears. This is possible since there is a little time before she attacks you. If you had already mastered MAX-Act, it is also helpful since Echidna is weak to fire attacks. If you deal enough damage to her, you will cause her to drop her guard and act dizzy. Buster her, and rev up Red Queen to deal max damage (Note: This is applicable in air or on land).
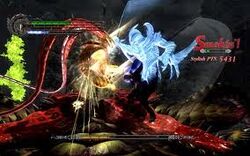
Second Phase

The Second Form of Echidna
When Echidna enters her "berserk" mode, she starts to glow a golden yellow, the environment rains, and her attacks are infused with seed launchers. Her defense and speed also increase a little bit, and she spends less time in each form. But be patient with her attacks and try to counter them if possible.
When she flies around in dragon mode, keep firing with your pistols to destroy the seed pods as they are shot at you. You can stay locked onto Echidna and will hit the vast majority of them, but one may slip by and hit you here or there. Not locking on and spraying bullets will give you better odds of hitting all of them, but may allow Echidna to blindside you. To avoid the seed pods when she drills into the ground, just jump. When she tail whips at you, you should be able to avoid the seed pods with any sort of jump or a just dodge.
Although Echidna gets more erratic in this phase, there's a quick and clean way to take her out. Only in her "berserk" mode, and only during this mission, can she be Bustered when she's flying at Nero in her dragon form. She won't have much health left at this phase, so a good DT (if you have it) Buster plus summoned swords should finish her off.