No edit summary |
|||
| Line 1: | Line 1: | ||
| − | {{stub}} |
||
| ⚫ | |||
{{InfoMission |
{{InfoMission |
||
| + | |game=Devil May Cry 4 |
||
| + | |num=11 |
||
|name=The Ninth Circle |
|name=The Ninth Circle |
||
|image= |
|image= |
||
|objective=Prevent the birth of a god! |
|objective=Prevent the birth of a god! |
||
|character=[[Nero]] |
|character=[[Nero]] |
||
| − | |demon1=[[ |
+ | |demon1=[[Mephisto]], [[Bianco Angelo]], [[Scarecrow]] |
| − | |demon2= [[Alto Angelo]], [[ |
+ | |demon2= [[Alto Angelo]], [[Faust]] |
|boss=[[Sanctus]] |
|boss=[[Sanctus]] |
||
| − | |item=1 [[ |
+ | |item=1 [[Devil Star S]] |
|adjudicator=Nero ''SSS'' |
|adjudicator=Nero ''SSS'' |
||
| − | |prev=[[Devil May Cry 4 walkthrough/M10| |
+ | |prev=[[Devil May Cry 4 walkthrough/M10|Wrapped in Glory]] |
| − | |next=[[Devil May Cry 4 walkthrough/M12| |
+ | |next=[[Devil May Cry 4 walkthrough/M12|A New Beginning]] |
}} |
}} |
||
| ⚫ | |||
| − | In order to reach the top and prevent the Savior from coming alive, you must first navigate what is essentially an obstacle course. Your skill with [[ |
+ | In order to reach the top and prevent the Savior from coming alive, you must first navigate what is essentially an obstacle course. Your skill with [[Snatch]] and Wall Hike will be put to the test as you use [[Grim Grip]]s to navigate vertical climbs. This can get frustrating as you find yourself failing again and again at each step, but the reward of beating the stuffing out of [[Sanctus]] is well worth it. |
The interesting thing about this mission is its absence of zones. It's essentially one large spiral that [[Nero]] has to climb. A teleport pad follows you up the levels, allowing you to return to the first floor at any time, though why you'd want to is the real question. |
The interesting thing about this mission is its absence of zones. It's essentially one large spiral that [[Nero]] has to climb. A teleport pad follows you up the levels, allowing you to return to the first floor at any time, though why you'd want to is the real question. |
||
| Line 21: | Line 22: | ||
First, you'll be given a head-to-toe view of [[the Savior]] just to give you a sense of how big it is. After that's over, go around the right side of the path (counterclockwise, since this is a big circle,) and there will be a SSS combat adjudicator for Nero. After that keep going and you'll find a blue device. Hit that and some grim grips will appear for you to get to the next floor of the level. |
First, you'll be given a head-to-toe view of [[the Savior]] just to give you a sense of how big it is. After that's over, go around the right side of the path (counterclockwise, since this is a big circle,) and there will be a SSS combat adjudicator for Nero. After that keep going and you'll find a blue device. Hit that and some grim grips will appear for you to get to the next floor of the level. |
||
| − | Here is your first encounter of the mission, |
+ | Here is your first encounter of the mission, Mephistos and a Faust. Take their cloaks down with your [[Devil Bringer]] and after they fall just go Jason Voorhees on them. Hit the switch on this level and an elevator will come to take you to the next floor. A teleporter thing will now appear, and it will follow you up every few floors, but just ignore it. It teleports you down to the ground floor, just in case you...drop your glasses? |
After taking the elevator, go to your right and there will be a gate with a pressure plate on the floor in front of it. A tablet on the wall nearby says, ''"Proceeding alone is strictly prohibited."'' Step on the platform and use Snatch to bring a scarecrow towards you and onto the pressure plate on the other side of the door. The gate will open and you can celebrate by pasting some Scarecrows. |
After taking the elevator, go to your right and there will be a gate with a pressure plate on the floor in front of it. A tablet on the wall nearby says, ''"Proceeding alone is strictly prohibited."'' Step on the platform and use Snatch to bring a scarecrow towards you and onto the pressure plate on the other side of the door. The gate will open and you can celebrate by pasting some Scarecrows. |
||
| Line 34: | Line 35: | ||
==Boss: Sanctus== |
==Boss: Sanctus== |
||
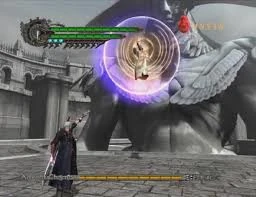
| − | [[File: |
+ | [[File:Advent Chamber_Savior.jpg|thumb|205px|Nero and Sanctus battling on top of the Advent Chamber]] |
This is a fairly straightforward fight. [[Sanctus]] hovers in the air above you with two small demonic orbs and sends a small variety of energy attacks either at you, or around himself. These are generally easy to avoid by simply jumping, but the one where beams appear all around Sanctus are tricky. Sometimes, the small demonic globes launch at you as well, but are easy to avoid. |
This is a fairly straightforward fight. [[Sanctus]] hovers in the air above you with two small demonic orbs and sends a small variety of energy attacks either at you, or around himself. These are generally easy to avoid by simply jumping, but the one where beams appear all around Sanctus are tricky. Sometimes, the small demonic globes launch at you as well, but are easy to avoid. |
||
The key is to use [[Devil Bringer#Movesets|Snatch]] on the small orbs to pull yourself toward him, and attack the blue shield surrounding his body. Once that blue shield is gone, he will be vulnerable to a few more hits before falling to the ground, where you can do the most damage to him. When he does lose his shield though, he will fly back and around faster making it harder for you to catch him, so keep using Snatch on his globes and him then knock him to the ground. |
The key is to use [[Devil Bringer#Movesets|Snatch]] on the small orbs to pull yourself toward him, and attack the blue shield surrounding his body. Once that blue shield is gone, he will be vulnerable to a few more hits before falling to the ground, where you can do the most damage to him. When he does lose his shield though, he will fly back and around faster making it harder for you to catch him, so keep using Snatch on his globes and him then knock him to the ground. |
||
| + | [[File:Buster M11.jpg|thumb|left|195px|Nero finishing Sanctus with his Buster.]] |
||
| − | + | On the ground, it's best to use the strongest possible move before he disappears and regenerates his shield. In [[Devil Trigger|D.T.]], use Summoned Swords while charging up either Maximum Bet or Showdown, or use Red Queen Combo 2 or 3 in either DT or Regular form to do some damage, then use Buster to launch a series of attacks on him, pressing the shoot button during this to keep sending summoned swords. When the attack is finished, Sanctus will hover in the air and bring back his shield in a blast of energy that will knock you back if you are near. Repeat the same strategy, and when his vitality boss gauge is about 2/3 depleted, a cutscene will ensue and he will enter The Savior. Once the cutscene finishes, The Savior will slam its fist on you and Sanctus will emerge and regenerate his shield again. In the event you take the blow, simply attack Sanctus with the same pattern again. But in the case where you've seen this before, time it right, and use Buster to smack the Savior's hand away and Sanctus will fall out unprotected. At this point, more combos, and a finish with Buster is sure to defeat him. |
|
| − | The following are the audio cues |
+ | The following are the audio cues: |
| ⚫ | |||
| − | |||
| ⚫ | |||
| ⚫ | |||
| + | *"The Savior is coming!"- Sanctus will recharge his shield. Be careful and do not get caught. |
||
| ⚫ | |||
| − | " |
+ | *"Burn!"- Sanctus will attack fireballs towards you. Dodge this one or counterattack using your gun. |
| ⚫ | |||
| − | "Burn!"- Sanctus will attack fireballs towards you. Dodge this one or counterattack using your gun.<br /><br /> |
||
| ⚫ | *"Behold the power of The Savior! Do it now!"- Sanctus will go inside the Savior's core and slams its fist towards you. Time this attack very carefully, Buster his hand when it is halfway towards you (similar to the False Savior boss). Succeeding this technique stuns Sanctus and can easily outmatch him. |
||
| − | |||
| ⚫ | |||
| − | |||
| ⚫ | "Behold the power of The Savior! Do it now!"- Sanctus will go inside the Savior's core and slams its fist towards you. Time this attack very carefully, Buster his hand when it is halfway towards you (similar to the False Savior boss). Succeeding this technique stuns Sanctus and can easily outmatch him. |
||
==Trivia== |
==Trivia== |
||
| − | *The name of the level is a |
+ | *The name of the level is a reference to Dante Alighieri's Divine Comedy. In the poem, the 9th circle of Hell is the circle of Treachery. |
| − | |||
| − | |||
| − | {{dmc4m}} |
||
Revision as of 04:51, 12 April 2013
In order to reach the top and prevent the Savior from coming alive, you must first navigate what is essentially an obstacle course. Your skill with Snatch and Wall Hike will be put to the test as you use Grim Grips to navigate vertical climbs. This can get frustrating as you find yourself failing again and again at each step, but the reward of beating the stuffing out of Sanctus is well worth it.
The interesting thing about this mission is its absence of zones. It's essentially one large spiral that Nero has to climb. A teleport pad follows you up the levels, allowing you to return to the first floor at any time, though why you'd want to is the real question.
Walkthrough
Advent Chamber
First, you'll be given a head-to-toe view of the Savior just to give you a sense of how big it is. After that's over, go around the right side of the path (counterclockwise, since this is a big circle,) and there will be a SSS combat adjudicator for Nero. After that keep going and you'll find a blue device. Hit that and some grim grips will appear for you to get to the next floor of the level.
Here is your first encounter of the mission, Mephistos and a Faust. Take their cloaks down with your Devil Bringer and after they fall just go Jason Voorhees on them. Hit the switch on this level and an elevator will come to take you to the next floor. A teleporter thing will now appear, and it will follow you up every few floors, but just ignore it. It teleports you down to the ground floor, just in case you...drop your glasses?
After taking the elevator, go to your right and there will be a gate with a pressure plate on the floor in front of it. A tablet on the wall nearby says, "Proceeding alone is strictly prohibited." Step on the platform and use Snatch to bring a scarecrow towards you and onto the pressure plate on the other side of the door. The gate will open and you can celebrate by pasting some Scarecrows.
Go up the stairs and you'll see another elevator and a Divinity Statue. The elevator doesn't have a switch, but you can break the fence in front of it for orbs and if you walk onto it, you'll find a red orb cache. Buy stuff from the Divinity Statue if necessary, then walk towards the gap on the right side. There are some grim grips for you to use to get to the other side, but they're a little tricky. It may take a few tries to get across, but that's ok since there's a red orb in the pit for you if you fall. You'll need to time your Snatches to get you to the far wall, then use Wall Hike to get onto the ledge.
Once you're over the wall, walk towards the other gap and you'll see more floating Grim Grips. Two of them move up and down, making it a bit trickier than the last one. If you fall here, there is a Devil Star(S) in the pit. Unfortunately, some Bianco Angelos appear and fence you in with a barrier. Defeat them to continue. It may still take a few tries to get across but fortunately, after the first time, no more enemies spawn if you fall in again. Like the first set, you'll need to Wall Hike to get onto the ledge, but make sure you do: There's another Red Orb cache up there.
Jump to the other side of the wall and an Alto Angelo will appear. After you defeat him, hit the blue device and some Grim Grips will appear. (There's also a Red Orb you can collect if you go past the blue device. Air Hike from the top of the wall there and use Snatch to get it.) Use the Grim Grips to get to the next floor. A switch will be there: Hit it and a barrier will appear you and some Bianco Angelos that come to play. After you defeat one, an Alto Angelo will spawn in its place. Dispatch them to call the elevator way back at the beginning of the Grim Grip challenges. You now need to go all the way back to that floor. Some more teleporters will appear but ignore them.
Once you get back to the elevator, a whole lot of demons will be waiting for you. First some Scarecrows spawn, but as you defeat them some Angelos appear. You can ether ignore them and go on the elevator, or fight them for orbs and style points. After you decide, take elevator and you'll be at the first Sanctus boss battle!
Boss: Sanctus
Nero and Sanctus battling on top of the Advent Chamber
This is a fairly straightforward fight. Sanctus hovers in the air above you with two small demonic orbs and sends a small variety of energy attacks either at you, or around himself. These are generally easy to avoid by simply jumping, but the one where beams appear all around Sanctus are tricky. Sometimes, the small demonic globes launch at you as well, but are easy to avoid.
The key is to use Snatch on the small orbs to pull yourself toward him, and attack the blue shield surrounding his body. Once that blue shield is gone, he will be vulnerable to a few more hits before falling to the ground, where you can do the most damage to him. When he does lose his shield though, he will fly back and around faster making it harder for you to catch him, so keep using Snatch on his globes and him then knock him to the ground.

Nero finishing Sanctus with his Buster.
On the ground, it's best to use the strongest possible move before he disappears and regenerates his shield. In D.T., use Summoned Swords while charging up either Maximum Bet or Showdown, or use Red Queen Combo 2 or 3 in either DT or Regular form to do some damage, then use Buster to launch a series of attacks on him, pressing the shoot button during this to keep sending summoned swords. When the attack is finished, Sanctus will hover in the air and bring back his shield in a blast of energy that will knock you back if you are near. Repeat the same strategy, and when his vitality boss gauge is about 2/3 depleted, a cutscene will ensue and he will enter The Savior. Once the cutscene finishes, The Savior will slam its fist on you and Sanctus will emerge and regenerate his shield again. In the event you take the blow, simply attack Sanctus with the same pattern again. But in the case where you've seen this before, time it right, and use Buster to smack the Savior's hand away and Sanctus will fall out unprotected. At this point, more combos, and a finish with Buster is sure to defeat him.
The following are the audio cues:
- "You fool! How dare you defy the Savior?"- This is his usual starting line.
- "You will fail!"/"Repent!"(Ground wave)- Avoid this one by snatching Sanctus.
- "The Savior is coming!"- Sanctus will recharge his shield. Be careful and do not get caught.
- "Burn!"- Sanctus will attack fireballs towards you. Dodge this one or counterattack using your gun.
- "Resistance is futile!"- Snatch Sanctus quickly or simply dodge his lightning attack.
- "Behold the power of The Savior! Do it now!"- Sanctus will go inside the Savior's core and slams its fist towards you. Time this attack very carefully, Buster his hand when it is halfway towards you (similar to the False Savior boss). Succeeding this technique stuns Sanctus and can easily outmatch him.
Trivia
- The name of the level is a reference to Dante Alighieri's Divine Comedy. In the poem, the 9th circle of Hell is the circle of Treachery.