|
I should have been the one to fill your dark soul with liiiiiiiiiiight! |
| This article is a stub and is missing information. You can help the Devil May Cry wiki by expanding it. |
Template:Dmc1m
- "Offer a sacrifice to the colisuem. It shall connect the path to the Wheel of Destiny."
- ―Riddle[src]
Walkthrough Part 1
You will start back at the courtyard where you fought Griffon after obtaining Ifrit. Kill the Kyklops, and then follow the convenient lighted pathway to the hall on the other side. On the far left, there is a blue-lighted place for your Emblem Shield. This will open the door and take you to the other side. The room is dark, and you won't be able to see anything if you head down the stairs now. Across from the door is a glowing pile of blue orbs. Examine it to pick up the Luminite. This will act like a lantern for Dante, and allow you to see what's around.
Travel down the stairs and deal with the Fetishes. On the left-hand wall is a breakable section. Smack it to open up a pathway and another breakable wall. Smack that again to get to a small circular room. There's a Blue Orb Fragment here, just waiting to be picked up. If you break the barrels you'll find a Holy Water as well.
After you've gotten all the party favors, head back to the blue door at the bottom of the stairs. Through this, you'll be in a booby-trapped room with spikes on one side and a moving floor. Spikes will also thrust out of the wall at intervals to spike you, and if you stop moving, you'll be pushed into the stationary wall of spikes. If that wasn't trouble enough, you'll have some Sin Scythes keeping you company as well.
You probably souldn't fight them on the moving floor. Run forward (against the flow of the floor) a few sections, dodging wall spikes as you go. On the left is an opening with a large Red Orb inside. Run in and up the steps to get to a low room with a white pedestal on the floor. That pedestal will refill your Devil Trigger gauge when you stand on it. Use this to your advantage.
After the fight, fill your DT gauge and continue around the moving floor. On the right hand side at the end of the curve is a pit-like area. The object of this obstacle course is to jump onto the little ledge from the edge of the pit, and then from there to the far side. If you fall down, the purple stuff at the bottom will sap your health, and you will have to jump back to the start. Use your Devil Trigger to your advantage if you need it. Air Hike is also useful here, if you bought it. Pick up the Pair of Lances.
Lances in hand, head back out the blue door. Kill the Fetishes again, and run back up to the coliseum courtyard. Some Sin Scythes will be waiting for you. Use your Shotgun to make quick work of them. Afterwards, head to the other side of the hallway along the side of the courtyard. Use the Emblem Shield on the red light door to zone into the next area. Kill the Fetishes here as well. There is another cracked wall here. Destroy it and all the stuff in the room behind it for some more red orbs and a Yellow Orb.
Through this blue door is the other side of the spinning floor room. This time, you need to activate the blue devices on the wall as you progress forward. Every shield device you activate will drop a platform on the other side. Once they're all activated, go to the far end and find the pit in the center, just like before. Jump across the platforms you just dropped to get to the Nightmare Beta. Grabbing this will reset the platforms. Jump into the pit and kill all of the Blades that spawn. Then, jump out and head back to the blue door. Kill the Fetishes if you like and go back to the courtyard. There are more Sin Scythes here; Nightmare Beta is a beast against these.
Once you're ready to proceed, head to the door with the two knights on them. (If you can better describe where to find this, go ahead. I always get turned around here.) Use the Pair of Lances. Step through the door and into the coliseum proper. Step forward onto the blue circle to hear a voice in your head ask for a sacrifice.
Boss: Griffon
|
Got to clean up the mess father left behind. This section of the article is a stub. You can help by expanding it. |
Oh, how convenient! Griffon isn't much different from your previous encounters, except all of his attacks are longer. His energy scissors will spawn multiple pairs of lines instead of just one or two, he will sent waves of horizontal electric bars intersperced with lightning balls, and will be all in all quicker and more annoying. At least he doesn't have that boomerang wing attack this time.
At about two thirds of his health, Griffon will fall and shear off one of his wings against the overpass. From here on he is ground bound.
Attacks
- Charge - Griffon will run at Dante and strike at him three times, instead of just once.
- Lightning Scissor - A ball of energy that will track Dante with two fingers of electricity, like a scissor
- Super Lightning Scissor - Just like before, this will spawn multiple lines of energy that home in on Dante.
- Continuous Scissor - Griffon will only use this when on the ground. Lightning will shoot from his mouth, just like a lightning scissor, but as soon as one pair of lines closes, another pair will spawn and track Dante. Dodge this by jumping the first one, staying on the ground for the second, jumping the third, and so forth, until Griffon lets up.
- Lightning wall - Griffon will send vertical bars of lightning at you. Carefully position yourself between the gaps to avoid damage.
- Scream - Horizontal bars of lightning. These may also have round lightning balls in between dante that track his movements. Run and jump to avoid these.
- Power Dive - Griffon will jump high in the air, and dive down on Dante, attempting to crush him beneath his feet. Griffon's trajectory will be highlighted by red lightning. Dodge the lightning and get out of the way when he comes down.
- Electric Storm - At less than ten percent of his life, Griffon will go berserk and just shower the whole place with lightning pillars. His life will drain very slowly as he does this, so if you can keep your distance and dodge the line of attacks that randomly shoot out, he will eventually die.
Walkthrough Part 2
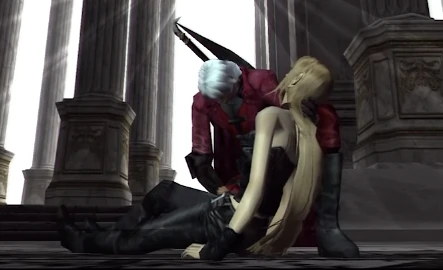
After Griffon's health is depleated, the large thing suspended over the coliseum will fall on him, pinning him to the ground. He will comment on Dante's powers, and then call on his master for aid. Mundus will appear, and kill Griffon for failing him. This cold-hearted act angers Dante, and he swears to Trish that he will kill Mundus. Trish then disappears in a bolt of yellow lightning.
When control is given back to you, collect the red orbs dropped by Griffon and jump on top of the central pillar thing that impaled him. An elevator will take you down. Here, grab the Wheel of Destiny hanging on the wall to end the mission.