No edit summary |
(→Trivia: he actually says "Guardian!" when changing to Royalguard while moving, clip for proof: youtu.be/hS9mXAkHPQs?t=341) |
||
| (46 intermediate revisions by 23 users not shown) | |||
| Line 1: | Line 1: | ||
| − | [[ |
+ | [[File:Royal Block Image Replacement.jpg|thumb|260px|Royalguard Style in ''Devil May Cry 4''.]] |
| − | The '''Royalguard Style''' is one of [[Dante]]'s styles in ''[[Devil May Cry 3]]'' and ''[[Devil May Cry |
+ | The '''Royalguard Style''' is one of [[Dante]]'s styles in ''[[Devil May Cry 3: Dante's Awakening|Devil May Cry 3]]'', ''[[Devil May Cry 4]]'', and ''[[Devil May Cry 5]]''. It emphasizes minimization and countering of enemy attacks.<ref>'''''Devil May Cry 3: Dante's Awakening''''', '''Style File — Royalguard''': "Minimizing the damage of an enemy attack, this style allows the player to maneuver into a more strategic position."</ref> |
| + | |||
{{TOCleft}} |
{{TOCleft}} |
||
| − | {{ |
+ | {{Clr}} |
==Gameplay== |
==Gameplay== |
||
| − | The Royalguard |
+ | The Royalguard Style is one of the most difficult styles to master but potentially one of the strongest. Though it is time-consuming to fill up the meter, ''Release'' and ''Just Release'' are two of the most damaging moves in the third and fourth games. These moves are powerful enough to kill almost all kinds of lesser demons, critically injure some of the larger demons, and inflict major damage to bosses. |
| + | |||
| + | In ''Devil May Cry 3'', the amount of stored power is signified by the three jewel-like green lights on the Style emblem which are part of the display bar. They will first blink, then light on continuously as Dante collects Rage. ''Devil May Cry 4'' changed this for a more easily interpreted Rage Meter with segments that slowly fill as Rage is collected. Dante's next Release strike will be increased in power the more Rage he has built, and the maximum amount of Rage that can be stored is increased along with the Royalguard Style level. ''Devil May Cry 5'' has a circular "Royal Gauge" divided into segments, starting out with four and upgrading to a full circle with ten segments. Acting similarly to Nero's [[Red Queen#Exceed|Exceed]] system, the Rage meter is only effective for a single Release before needing to be refilled. The usage of Super Costumes provides an automatically replenishing Rage meter that restores to maximum in a very short time. |
||
| + | |||
| ⚫ | Dante can block lesser demons without breaking his 'blocking' stance. But larger demons with stronger attacks can break his normal guard. This can be dangerous because of long recovery times which leave Dante open for attack. In ''Devil May Cry 4'', Dante's recovery time can be canceled by immediately performing Trickster's Dash. However, if mistimed, the strongest of the enemy attacks will crush right through the Block, ignoring it completely and causing Dante to suffer full damage despite the effort. |
||
| + | |||
| + | Interestingly, Royalguard is capable of completely countering and altering enemy tactics in a way that other Styles can't. For example, Block is capable of denying grab attempts, such as [[Nevan]]'s kiss attack or [[Soul Eater]]'s abduction. Blocks or Perfect Blocks can also protect against area attacks such as [[Vergil]]'s Judgment Cut End, and even some automatic hits like [[Agnus]]' life-siphoning or [[Pandora]]'s Omen form. It can also guard against counter-hits, such as the backfire damage from hitting a shielded [[Blitz]] with a melee attack. If an attack scores multiple hits, each hit can be Perfect Guarded. |
||
| + | |||
| + | Royalguard can only generally only defend against attacks that actually deal damage: it does nothing against those that do not, such as the [[Leviathan]] heart's Red Orb or Devil Trigger drain, or [[Geryon]]'s time-distorting attacks. There are some exceptions to this, such as the vortex phase of [[Goliath]]'s swallow attack. |
||
| + | |||
| + | Royalguard in ''Devil May Cry 5'' is much less punishing than in previous games, though contrary to many claims, the perfect guard timing window is exactly the same (6 frames). The main change is that regular guards no longer cause Dante to take chip damage: instead, a normal block will reduce Dante's DT gauge. If it is empty, Dante's guard will be broken: otherwise, Dante's guard is unbreakable. Normal guards also fill the Royal Gauge. Royal Block instead has the bonus of both increasing the DT gauge, providing a significant Style bonus, and fills the Royal Gauge more than a normal Block. Upgrading the Style now increases the size of the Royal Gauge, up to ten bars when the style is fully upgraded. |
||
| + | |||
| + | Royalguard no longer rotates Dante to face the enemy he is guarding: instead, he has multiple animations for guarding hits coming from different directions, and is even able to guard multiple hits with his back to an enemy. Dante also has voice cues that occasionally accompany perfect blocks, particularly if he has executed several in a row. |
||
| + | [[File:Royalguard Dreadnaught Form.png|thumb|150px|Dante in Dreadnaught form.]] |
||
| + | Royalguard's ultimate move has been changed once again from the rather useless Dreadnaught to a new move called "Royal Revenge." This move takes one segment of the Royal Gauge, and has Dante enter a "ready" stance: if an enemy strikes him in this stance, their hit is automatically nullified and Dante executes a powerful counter-hit which is like a low-damage Royal Release in terms of behavior. There is no timing requirement to Royal Revenge: as long as Dante is in the stance when he is struck, it will deal a hit. |
||
| + | When Royalguard is used with [[Devil Sword Dante]]'s Swords Formation active, the summoned swords will reduce damage from all incoming blows Dante fails to block, and increase all gains to the Royal Gauge from blocking. |
||
| − | In ''Devil May Cry 3'', the amount of pent up power is signified by the jewel-like dots on the display bar. Dante's next strike will be increased in power by about 2% for every gem lit up. Effective for the next blow only, once per charge, acting similarly to Nero's [[Red Queen#Exceed|Exceed]] system. |
||
| + | In ''Devil May Cry 4'' and ''5'', when Dante chooses this style he will lower his posture into a braced position, leaning forward with his right arm and leg as if exaggerating a heater-shield guard stance, and shouts "Royal Guard!" while snapping his left hand behind him. An electrical aura sparks along with it: a pale blue tint in DMC4; glowing red in DMC5, similar to the other Styles. |
||
| ⚫ | Dante can block lesser demons without breaking his 'blocking' stance. But larger demons with stronger |
||
==Movesets== |
==Movesets== |
||
| + | <tabber> |
||
| − | + | Devil May Cry 3= |
|
{| class="wikitable" |
{| class="wikitable" |
||
|- bgcolor="#CCCCCC" |
|- bgcolor="#CCCCCC" |
||
| Line 23: | Line 39: | ||
| Block & Charge || {{button|c}} (ground) || Block incoming attacks, slowly building up your anger and adrenaline. |
| Block & Charge || {{button|c}} (ground) || Block incoming attacks, slowly building up your anger and adrenaline. |
||
|- |
|- |
||
| − | | |
+ | | Royal Block || {{button|c}} || [[Just Combo|Just]] Block. Negate the damage of the attack and charges the Rage Meter more than usual. |
|- |
|- |
||
| Release || {{button|r1}}+{{button|u}}+{{button|c}} (ground) || Release pent-up anger charged from blocked enemy attacks to do major damage. |
| Release || {{button|r1}}+{{button|u}}+{{button|c}} (ground) || Release pent-up anger charged from blocked enemy attacks to do major damage. |
||
|- |
|- |
||
| − | | |
+ | | Royal Release || {{button|r1}}+{{button|u}}+{{button|c}} || [[Just Combo|Just]] Release. Deals significantly more damage than a normal Release. |
|- |
|- |
||
! colspan=3|Level 2 |
! colspan=3|Level 2 |
||
|- |
|- |
||
| − | | Air Block || {{button|c}} (mid-air) || Block in mid-air. |
+ | | Air Block || {{button|c}} (mid-air) || Block in mid-air. Can Royal Block. |
|- |
|- |
||
| − | | Air Release || {{button|r1}}+{{button|u}}+{{button|c}} (mid-air) || Perform a release in mid-air. |
+ | | Air Release || {{button|r1}}+{{button|u}}+{{button|c}} (mid-air) || Perform a release in mid-air. Can Royal Release. |
|- |
|- |
||
! colspan="3"|Level 3 |
! colspan="3"|Level 3 |
||
|- |
|- |
||
| − | | Ultimate || {{button|r1}}+{{button|d}}+{{button|c}} || Block enemy attacks and convert the block energy into life power for yourself. |
+ | | Ultimate || {{button|r1}}+{{button|d}}+{{button|c}} || Block enemy attacks and convert the block energy into life power for yourself. Cannot Royal Block. Anything that breaks a normal Block will break Ultimate. |
|} |
|} |
||
| + | |-| |
||
| − | |||
| − | + | Devil May Cry 4= |
|
{| class="wikitable" |
{| class="wikitable" |
||
|- bgcolor="#CCCCCC" |
|- bgcolor="#CCCCCC" |
||
| Line 47: | Line 63: | ||
! Description |
! Description |
||
|- |
|- |
||
| − | | Block || {{button|c}}/{{button|b| |
+ | | Block || {{button|c}}/{{button|b|xbone}} (ground) || Minimize the damage taken from an enemy's attack, while at the same time accumulating power within the Royal Gauge. |
|- |
|- |
||
| − | | Air Block || {{button|c}}/{{button|b| |
+ | | Air Block || {{button|c}}/{{button|b|xbone}} (mid-air) || Minimize the damage taken from an enemy's mid-air attack, while at the same time accumulating power within the Royal Gauge. |
|- |
|- |
||
| Royal Block || [[Just Combo|Just]] Block || Block an enemy's attack at the last second to negate all damage and greatly increase the angry energy stored within the Royal Gauge. |
| Royal Block || [[Just Combo|Just]] Block || Block an enemy's attack at the last second to negate all damage and greatly increase the angry energy stored within the Royal Gauge. |
||
|- |
|- |
||
| − | | Release || {{button|r1}}+{{button|u}}+{{button|c}}/{{button|rb| |
+ | | Release || {{button|r1}}+{{button|u}}+{{button|c}}/{{button|rb|xbone}}+{{button|u|xbone}}+{{button|b|xbone}} (ground) || Release all the energy stored in the Royal Gauge, and lash out at your enemies with an explosion of dreadful power. |
|- |
|- |
||
| − | | Air Release || {{button|r1}}+{{button|u}}+{{button|c}}/{{button|rb| |
+ | | Air Release || {{button|r1}}+{{button|u}}+{{button|c}}/{{button|rb|xbone}}+{{button|u|xbone}}+{{button|b|xbone}} (mid-air) || Release all the energy stored in the Royal Gauge, and lash out at airborne enemies with an explosion of dreadful power. |
|- |
|- |
||
| Royal Release || [[Just Combo|Just]] Release || Release all the anger stored within you as a violent, damaging counter-attack against those unfortunate enough to provoke you. |
| Royal Release || [[Just Combo|Just]] Release || Release all the anger stored within you as a violent, damaging counter-attack against those unfortunate enough to provoke you. |
||
|- |
|- |
||
| − | | Dreadnaught || {{button|r1}}+{{button|d}}+{{button|c}}/{{button|rb| |
+ | | Dreadnaught || {{button|r1}}+{{button|d}}+{{button|c}}/{{button|rb|xbone}}+{{button|d|xbone}}+{{button|b|xbone}} || A mysterious technique that transforms the body into a seemingly metallic shell impervious to enemy assault. The duration of the technique is linked to the amount of energy stored within the Royal Gauge. |
|} |
|} |
||
| + | |-| |
||
| + | Devil May Cry 5= |
||
| + | {| class="wikitable" |
||
| + | |- bgcolor="#CCCCCC" |
||
| + | ! Action |
||
| + | ! Command |
||
| + | ! Description |
||
| + | |- |
||
| + | | Block || {{button|c}}/{{button|b|xbone}} (ground) || Blocks enemy attacks and neutralizes damage while also filling the Royal Gauge. This technique expends the DT Gauge each time it is activated. While blocking, you can move around. |
||
| + | |- |
||
| + | | Air Block || {{button|c}}/{{button|b|xbone}} (mid-air) || Activates a mid-air version of Block, neutralizing damage and filling the Royal Gauge. This technique expends the DT Gauge each time it is activated. |
||
| + | |- |
||
| + | | Royal Block || {{button|c}}/{{button|b|xbone}} || Block an enemy attack as close as possible to defend without expending the DT Gauge. Fills the Royal Gauge more than a standard Block. |
||
| + | |- |
||
| + | | Release || {{button|r1}}+{{button|u}}+{{button|c}}/{{button|rb|xbone}}+{{button|u|xbone}}+{{button|b|xbone}} (ground) || Release the energy built up in your Royal Gauge, dealing massive damage to enemies. |
||
| + | |- |
||
| + | | Air Release || {{button|r1}}+{{button|u}}+{{button|c}}/{{button|rb|xbone}}+{{button|u|xbone}}+{{button|b|xbone}} (mid-air) || Release the energy built up in your Royal Gauge in mid-air, dealing massive damage to enemies. |
||
| + | |- |
||
| + | | Royal Release || {{button|r1}}+{{button|u}}+{{button|c}}/{{button|rb|xbone}}+{{button|u|xbone}}+{{button|b|xbone}} || Draw in an enemy attack before releasing the energy built up in your Royal Gauge to deliver a tremendous blast of damage. |
||
| + | |- |
||
| + | | Royal Revenge || {{button|r1}}+{{button|d}}+{{button|c}}/{{button|rb|xbone}}+{{button|d|xbone}}+{{button|b|xbone}} (ground) || Use one stock of Royal Gauge to nullify enemy attacks and perform a counterattack. Hold the button to maintain readiness. |
||
| + | |} |
||
| + | </tabber> |
||
==Dreadnaught Glitch== |
==Dreadnaught Glitch== |
||
| − | [[Video:Devil May Cry 4 - Dreadnaught Costume Glitch|thumb|right|280px|A video of the glitch]] |
||
A small visual glitch involving the Dreadnaught Form allows the player to use the Dreadnaught model and its audio clips while being able to move normally and taking damage as usual. In order to utilize this glitch, the player must switch their weapons precisely at the moment when Dante changes back from using it. However, this glitch was fixed on the PC release. |
A small visual glitch involving the Dreadnaught Form allows the player to use the Dreadnaught model and its audio clips while being able to move normally and taking damage as usual. In order to utilize this glitch, the player must switch their weapons precisely at the moment when Dante changes back from using it. However, this glitch was fixed on the PC release. |
||
| + | |||
| − | {{ |
+ | {{Clr}} |
| + | |||
==Gallery== |
==Gallery== |
||
<gallery> |
<gallery> |
||
dreadnought_big_other_5e2b66617ceae3c0e8cda81cf84ec698.jpg|Dreadnaught concept art. |
dreadnought_big_other_5e2b66617ceae3c0e8cda81cf84ec698.jpg|Dreadnaught concept art. |
||
| + | dreadnought-20343.jpg |
||
</gallery> |
</gallery> |
||
| + | ==Trivia== |
||
| − | |||
| − | |||
| − | |||
| − | |||
| − | |||
| − | |||
| − | |||
| − | |||
| − | |||
| − | |||
| − | ==<span style="font-size:20px;">Trivia</span>== |
||
*While using "Dreadnaught", Dante's voice noticeably is higher-pitched than in [[Devil Trigger]] state. |
*While using "Dreadnaught", Dante's voice noticeably is higher-pitched than in [[Devil Trigger]] state. |
||
*Dante's "Block" stance is similar to that of [[w:c:streetfighter:Fei Long|Fei Long]] from the ''[[Street Fighter]]'' series. |
*Dante's "Block" stance is similar to that of [[w:c:streetfighter:Fei Long|Fei Long]] from the ''[[Street Fighter]]'' series. |
||
*Dante's release in DMC 4 has different effects based on the meter. For example, an empty meter will release a rather small and weak light. A filled meter will have stronger light, where a 3/4 or full meter will have strongest light with vibrating screen. And a full gauge royal release will cause some extra electric-like sound. |
*Dante's release in DMC 4 has different effects based on the meter. For example, an empty meter will release a rather small and weak light. A filled meter will have stronger light, where a 3/4 or full meter will have strongest light with vibrating screen. And a full gauge royal release will cause some extra electric-like sound. |
||
| + | *In ''Devil May Cry 4'', when Dante swaps to Royalguard style, he will shout "Royal Guard!" when stationary or shout "Guardian!" when he is on the move. |
||
==External links== |
==External links== |
||
| Line 91: | Line 123: | ||
==References== |
==References== |
||
{{reflist|1}} |
{{reflist|1}} |
||
| ⚫ | |||
| ⚫ | |||
| + | {{DMC5|technique}} |
||
| + | [[es:Estilo Defensa Real]] |
||
| ⚫ | |||
| ⚫ | |||
[[Category:Styles]] |
[[Category:Styles]] |
||
| + | [[Category:Devil May Cry 3]] |
||
| + | [[Category:Devil May Cry 4]] |
||
| + | [[Category:Devil May Cry 5]] |
||
Revision as of 15:13, 9 April 2020

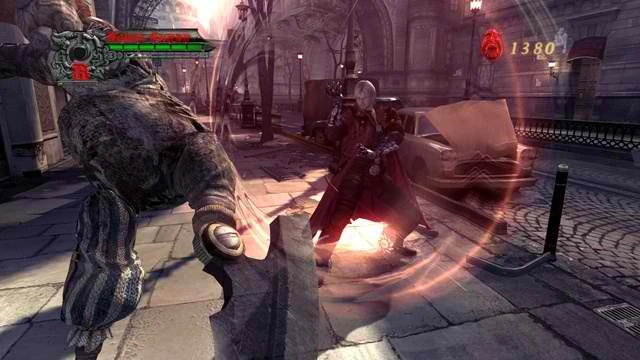
Royalguard Style in Devil May Cry 4.
The Royalguard Style is one of Dante's styles in Devil May Cry 3, Devil May Cry 4, and Devil May Cry 5. It emphasizes minimization and countering of enemy attacks.[1]
Gameplay
The Royalguard Style is one of the most difficult styles to master but potentially one of the strongest. Though it is time-consuming to fill up the meter, Release and Just Release are two of the most damaging moves in the third and fourth games. These moves are powerful enough to kill almost all kinds of lesser demons, critically injure some of the larger demons, and inflict major damage to bosses.
In Devil May Cry 3, the amount of stored power is signified by the three jewel-like green lights on the Style emblem which are part of the display bar. They will first blink, then light on continuously as Dante collects Rage. Devil May Cry 4 changed this for a more easily interpreted Rage Meter with segments that slowly fill as Rage is collected. Dante's next Release strike will be increased in power the more Rage he has built, and the maximum amount of Rage that can be stored is increased along with the Royalguard Style level. Devil May Cry 5 has a circular "Royal Gauge" divided into segments, starting out with four and upgrading to a full circle with ten segments. Acting similarly to Nero's Exceed system, the Rage meter is only effective for a single Release before needing to be refilled. The usage of Super Costumes provides an automatically replenishing Rage meter that restores to maximum in a very short time.
Dante can block lesser demons without breaking his 'blocking' stance. But larger demons with stronger attacks can break his normal guard. This can be dangerous because of long recovery times which leave Dante open for attack. In Devil May Cry 4, Dante's recovery time can be canceled by immediately performing Trickster's Dash. However, if mistimed, the strongest of the enemy attacks will crush right through the Block, ignoring it completely and causing Dante to suffer full damage despite the effort.
Interestingly, Royalguard is capable of completely countering and altering enemy tactics in a way that other Styles can't. For example, Block is capable of denying grab attempts, such as Nevan's kiss attack or Soul Eater's abduction. Blocks or Perfect Blocks can also protect against area attacks such as Vergil's Judgment Cut End, and even some automatic hits like Agnus' life-siphoning or Pandora's Omen form. It can also guard against counter-hits, such as the backfire damage from hitting a shielded Blitz with a melee attack. If an attack scores multiple hits, each hit can be Perfect Guarded.
Royalguard can only generally only defend against attacks that actually deal damage: it does nothing against those that do not, such as the Leviathan heart's Red Orb or Devil Trigger drain, or Geryon's time-distorting attacks. There are some exceptions to this, such as the vortex phase of Goliath's swallow attack.
Royalguard in Devil May Cry 5 is much less punishing than in previous games, though contrary to many claims, the perfect guard timing window is exactly the same (6 frames). The main change is that regular guards no longer cause Dante to take chip damage: instead, a normal block will reduce Dante's DT gauge. If it is empty, Dante's guard will be broken: otherwise, Dante's guard is unbreakable. Normal guards also fill the Royal Gauge. Royal Block instead has the bonus of both increasing the DT gauge, providing a significant Style bonus, and fills the Royal Gauge more than a normal Block. Upgrading the Style now increases the size of the Royal Gauge, up to ten bars when the style is fully upgraded.
Royalguard no longer rotates Dante to face the enemy he is guarding: instead, he has multiple animations for guarding hits coming from different directions, and is even able to guard multiple hits with his back to an enemy. Dante also has voice cues that occasionally accompany perfect blocks, particularly if he has executed several in a row.
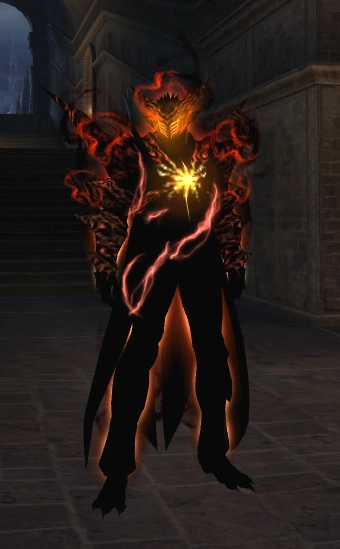
Dante in Dreadnaught form.
Royalguard's ultimate move has been changed once again from the rather useless Dreadnaught to a new move called "Royal Revenge." This move takes one segment of the Royal Gauge, and has Dante enter a "ready" stance: if an enemy strikes him in this stance, their hit is automatically nullified and Dante executes a powerful counter-hit which is like a low-damage Royal Release in terms of behavior. There is no timing requirement to Royal Revenge: as long as Dante is in the stance when he is struck, it will deal a hit.
When Royalguard is used with Devil Sword Dante's Swords Formation active, the summoned swords will reduce damage from all incoming blows Dante fails to block, and increase all gains to the Royal Gauge from blocking.
In Devil May Cry 4 and 5, when Dante chooses this style he will lower his posture into a braced position, leaning forward with his right arm and leg as if exaggerating a heater-shield guard stance, and shouts "Royal Guard!" while snapping his left hand behind him. An electrical aura sparks along with it: a pale blue tint in DMC4; glowing red in DMC5, similar to the other Styles.
Movesets
| Action | Command | Description |
|---|---|---|
| Level 1 | ||
| Block & Charge | Block incoming attacks, slowly building up your anger and adrenaline. | |
| Royal Block | Just Block. Negate the damage of the attack and charges the Rage Meter more than usual. | |
| Release | Release pent-up anger charged from blocked enemy attacks to do major damage. | |
| Royal Release | Just Release. Deals significantly more damage than a normal Release. | |
| Level 2 | ||
| Air Block | Block in mid-air. Can Royal Block. | |
| Air Release | Perform a release in mid-air. Can Royal Release. | |
| Level 3 | ||
| Ultimate | Block enemy attacks and convert the block energy into life power for yourself. Cannot Royal Block. Anything that breaks a normal Block will break Ultimate. | |
| Action | Command | Description |
|---|---|---|
| Block | Minimize the damage taken from an enemy's attack, while at the same time accumulating power within the Royal Gauge. | |
| Air Block | Minimize the damage taken from an enemy's mid-air attack, while at the same time accumulating power within the Royal Gauge. | |
| Royal Block | Just Block | Block an enemy's attack at the last second to negate all damage and greatly increase the angry energy stored within the Royal Gauge. |
| Release | Release all the energy stored in the Royal Gauge, and lash out at your enemies with an explosion of dreadful power. | |
| Air Release | Release all the energy stored in the Royal Gauge, and lash out at airborne enemies with an explosion of dreadful power. | |
| Royal Release | Just Release | Release all the anger stored within you as a violent, damaging counter-attack against those unfortunate enough to provoke you. |
| Dreadnaught | A mysterious technique that transforms the body into a seemingly metallic shell impervious to enemy assault. The duration of the technique is linked to the amount of energy stored within the Royal Gauge. |
| Action | Command | Description |
|---|---|---|
| Block | Blocks enemy attacks and neutralizes damage while also filling the Royal Gauge. This technique expends the DT Gauge each time it is activated. While blocking, you can move around. | |
| Air Block | Activates a mid-air version of Block, neutralizing damage and filling the Royal Gauge. This technique expends the DT Gauge each time it is activated. | |
| Royal Block | Block an enemy attack as close as possible to defend without expending the DT Gauge. Fills the Royal Gauge more than a standard Block. | |
| Release | Release the energy built up in your Royal Gauge, dealing massive damage to enemies. | |
| Air Release | Release the energy built up in your Royal Gauge in mid-air, dealing massive damage to enemies. | |
| Royal Release | Draw in an enemy attack before releasing the energy built up in your Royal Gauge to deliver a tremendous blast of damage. | |
| Royal Revenge | Use one stock of Royal Gauge to nullify enemy attacks and perform a counterattack. Hold the button to maintain readiness. |
Dreadnaught Glitch
A small visual glitch involving the Dreadnaught Form allows the player to use the Dreadnaught model and its audio clips while being able to move normally and taking damage as usual. In order to utilize this glitch, the player must switch their weapons precisely at the moment when Dante changes back from using it. However, this glitch was fixed on the PC release.
Gallery
")
")
Trivia
- While using "Dreadnaught", Dante's voice noticeably is higher-pitched than in Devil Trigger state.
- Dante's "Block" stance is similar to that of Fei Long from the Street Fighter series.
- Dante's release in DMC 4 has different effects based on the meter. For example, an empty meter will release a rather small and weak light. A filled meter will have stronger light, where a 3/4 or full meter will have strongest light with vibrating screen. And a full gauge royal release will cause some extra electric-like sound.
- In Devil May Cry 4, when Dante swaps to Royalguard style, he will shout "Royal Guard!" when stationary or shout "Guardian!" when he is on the move.
External links
References
- ↑ Devil May Cry 3: Dante's Awakening, Style File — Royalguard: "Minimizing the damage of an enemy attack, this style allows the player to maneuver into a more strategic position."